TABLE OF CONTENTS
This support article outlines how EMIS practices edit the Ardens "Flu vaccine administration 2025–26" protocol. This protocol is designed to help healthcare professionals accurately record flu vaccination activity as part of the 2025–26 Seasonal Influenza Vaccination Programme.
Step 1 - Copy Protocol
Before editing the protocol, you must first create a local copy.
To do this, access the Resource Publisher module (providing you have the relevant permissions) and navigate to the Shared folders > Ardens Live National Content >Vaccination protocols > Seasonal Immunisations 2025-26 folder.
Right-click on the "Flu vaccine administration 2025-26 (with concepts)" protocol and select Copy.
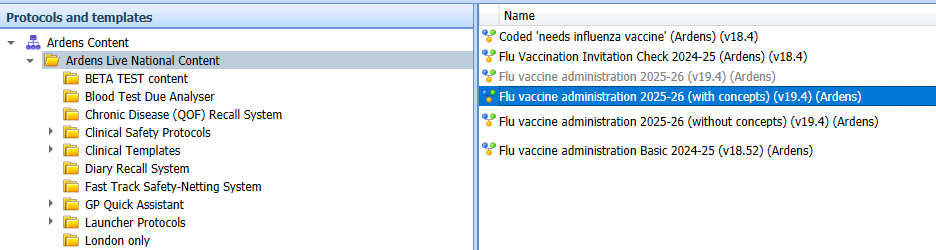
⚠️ Please note: The "Flu vaccine administration 2025-26 (without concepts)" protocol must only be used if there are issues copying the version with concepts.
Once copied, navigate to one of your appropriate practice folder locations and select Paste. The protocol must then be renamed. To do this, right click on the copied version of the protocol and select Properties. Within the following field, enter a new name for the protocol:

Then select Save.
We then advise to refresh resource publisher by selecting the Refresh button on the ribbon:

Step 2 - Edit Protocol
To record vaccine administration using the protocol, you will need to add your vaccine batch numbers and expiry dates.
Navigate to the local copy of the protocol that you have now saved. Right-click and select Protocol > Edit

This will open the protocol in edit mode. Use the scroll bar to navigate to the right-hand column of the screen, which is labelled at the top as ‘EDIT BATCH NUMBER EXPIRY DATE...’.

This column contains "Multiple Choice Question" boxes for each vaccine type, with associated "Add Coded Data" boxes. You will need to edit each box to enter the relevant batch numbers and expiry dates for your vaccines.

Double-click on the required Multiple Choice Question box, e.g., LAIV, to edit. Select the first option and click Edit. Replace the X with details of the batch number and vaccine.

Repeat this for each option with the Multiple Choice Question box, and click OK once complete.
Next, edit the corresponding 'Add Coded Data' boxes by tracing the line from each multiple choice option to its associated data entry field.

Double-click to open. Using the fields provided, enter the Manufacturer, Expiry Date, Batch Number, and GMS information. Once finished, click OK.

If all the qualifier fields are not initially available, you will need to click on 'Add qualifier' and select each in turn:

Complete this step for each vaccine type.
Click Save and Close once complete.
Users may occasionally encounter the following warning message:

This is EMIS flagging the protocol as potentially causing an endless loop. However, we have included a safeguard to prevent this, so it is safe for you to select 'Yes'.
Once saved, each individual user will need to add the protocol to their F12 key, please refer to this support article on how to do this.
We recommend activating the EMIS protocol, as it helps clinicians identify patients eligible for vaccination by displaying an alert in the pink "alert box".
To activate, navigate to Configuration > Resource Publisher > EMIS Library. Then open the Influenza folder (inside EMIS Protocols).

Video
Watch this 4-minute video for further guidance.
If you require any further assistance on the process above, please contact Ardens support on: